The Orange Whip Trainer Review

The Orange Whip Trainer is a swing training aid. It is 47.5″ long and weighs 1.76 lbs – designed to simulate a driver. It can be used as a training aid and/ or a warm-up and stretching tool.

Swinging this trainer will help you swing at good tempo while being on-plane and balanced. If you are not balanced/ on-plane with your swing you will not be able to repeat several swings in a row. It is also supposed to teach you a nice/ rhythmic tempo; which carries over to your real golf swing.

When using the Orange Whip for warm up it loosens the muscles and also helps with your first drive. As it is weighted, it can be used in the same way as a baseball player swinging a bat with a weight in the on-deck circle. You take a few swings with this and then when you pick up the golf club, it feels might lighter. You can swing faster and with ease. Although you can use it before you start, note that it is illegal to use during the round.
 
There are three versions;

  • Trainer: 47.5″ long for men and tall women
  • Golden: 44″ for shorter men (<5′ 6″), women and teens
  • Hickory: 38″ for juniors aged 7-12

I came across this product online while looking at swing training aids. I did some more research and it got very positive reviews on the golf forums. Although there are many golf training aids out there, this is one (of very few) which actually works and helps with your swing.

I found the product useful for a brief 3-5 minute warm up before a round. After doing a couple of sessions with the Orange Whip, my hand started to feel a little sore and started to get a blister. I would recommend using a glove when swinging with this training aid.

The Orange Whip Trainer retails for $109. On a side note I should mention that SKLZ has a product very similar to the Orange Whip called Gold Flex Strength and Tempo Trainer. It is half the price and seems very similar. I tried it out briefly at the store and the feel seems similar. The only difference I could notice is that the Orange Whip has a counter balance on the handle, which the SKLZ does not. I think the Orange Whip is may be a little better quality to the SKLZ also. You can get details of the Gold Flex Strength and Tempo Trainer by clicking on the below link.

Shop SKLZ Performance Training Tools

Ping Golf Tour Van

Each golf equipment manufacturer has their own tour truck which travels around the professional golf tours shadowing the golfers. At each tour event there will be a tour truck present where they will work on club repairs and adjustments for the golf pro’s.

This is a good video which shows the inner-workings of a tour truck. The Ping Fitter also answers viewer questions. This was filmed during the 2013 Scottish Open, which Phil Mickelson won.

Brush-t Pro Tee Review

I came across the Brush-t Pro Tee’s while perusing the classifieds section of Golf Digest. I am always looking to try new products and gadgets so picked up a packet to try out.

The Brush-t is a golf tee and what sets it apart from the others is that you sit the ball on top of bristles. The bristles are synthetic and bend upon impact. This reduces resistance which supposedly increases length and accuracy of drives. From the manufacturers website…

The Brush-t ® bristles have been designed to do away with resistance from impact with the tee. The ball is supported largely by air which means that the speed of the club face at impact is concentrated so perfectly on the ball, that the sheer kinetic energy helps create a longer and straighter shot.

Accuracy: Brush T eliminates up to 2% of left or right deflection and that means greater accuracy for your shots. Over 300 yards a 2º deflection can make your shot up to 14 yards wide of the mark!

Each tee comes in a capsule style holder. The lid acts as a ball marker and there is a preserver in the middle which helps protect the bristles. I really like the look of the product and how it is packaged. It is very pleasing to the eye. I picked up a multi-pack and each size tee is a different color. It also has written on the side which club it is for, i.e. blue is 3 wood, black is driver etc.

When I tried these out I found that the tee goes into the ground very easily – unlike the X-Blade tee’s. Because of the shape of the tee, it means that each time you stick it into the ground the ball will be at a perfect height for the club you are using. Thus helping with consistency. The ball was easy to place on the tee and sat on top of the bristles without movement.

I enjoyed using the tees, however in my limited use I found no difference in performance in terms of distance and accuracy. I will continue to use these tees in the upcoming months and update my progress. They are currently one of my favorite types of tee. It is so easy to place the ball on top of it and I like the design/ colors. They seem to do the job and are not gimmicky like some of the tees on the market. They also seem to be well made and will last.

The Brush-t can be found at the usual retail and online golf providers. The 4 piece multi-pack is priced at $9.99, the 3 pack 3-wood tees are $5.99.

Wedge Selection and Bounce

It is important to have the correct wedges to fit both your swing and the other clubs in your bag. With 14 clubs allowed in your bag, many people opt to drop a second wood/ high iron and have three (not including PW) dedicated wedges in their bag.

It is important to have the right gaps between your clubs. I suggest you look at your pitching wedge loft and go from there. You want to keep your gap between your clubs consistent and not exceed more than 6 degrees. An example would be… if your PW is 45*, a popular choice would be GW at 50*, SW at 56* and LB at 60*. Alternatively if could go Sand Wedge at 54* and Lob Wedge at 58*.

An important aspect of the wedge is the bounce. All top manufacturers offer their wedges in a bunch of different options. For example Titleist Vokey’s offer their SM4 wedges in 23 different loft and bounces for each club finish. Bounce can be a confusing term. It is not necessarily the amount the ball will bounce, but the angle at which the club head will slide along the ground and impact the ball.

When you hit a wedge shot;

  • If you have little or no divot, you are a slider/ sweeper. You should look for a club with low bounce.
  • If you take a regular sized divot, you are a driver/ slider. A medium sized bounce will work for you.
  • If you take a large divot, then you are a digger/ driver. A high bounce wedge will work in this scenario.

The correct bounce will help you hit more consistently. If you have a low bounce swing, but have a high bouce club, it may cause you to “top” the ball.

With bounce course conditions also come into account. If you play in the Arizona desert (where the ground is generally firm) you would most probably need a low bounce wedge. However if you play in Pacific North West (where it rains a lot), the ground may be soft and soggy. In that case you should look at a higher bounce to compensate for it.

When selecting your wedges you may want to go for a combination of bounces. I am a slider/sweeper, but I like to have a sand iron with a high bounce to use from fluffy sand or long grass (rough). But a low bounce lob wedge for work around the green on short grass and firm ground conditions.

There are traditionally three different finishes to wedges. Traditional chrome, black nickel and raw finish. Some golfers prefer the black nickel and raw finishes because there is no glare from the sun. The raw finishes (also known as oil can, rustique, rusty) have unfinished faces. These are designed to rust and have patina. The club faces are softer to play; which some people prefer the feel. It has been proven that raw wedges having more spin than others, is nothing more than a myth and just an old-wives tale. They all spin the same.

Confused?? It is a very complex subject and wedges can be the toughest clubs in the bag to pick out. As with all clubs look for something which feels good to swing and easy on the eye at set-up.

Here is a good video from Mark Crossfield which explains wedge bounce…

iPing – Putting App

A few months back Ping released a app (iPing) to give you putting feedback. It is available as a FREE download for iPhone (4 and above), iPod Touch (iOS 5 required) or Android (Samsung Galaxy 3, Note 2).

To go along with this app you need a cradle which attaches the phone to the club. This retails for $14.99-$19.99. I simply attached the phone to the putter shaft with some rubber bands. You can also get creative and create your own cradle. You just need a shaft clamp/ clip and a spare hard phone case (you can buy on eBay for less than $2). You simply just superglue the clip onto the back of the case and voila!

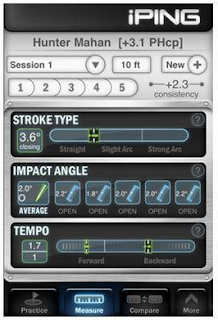
The app is really simple to use. Basically you can view a bunch of stats about your putting, which is determined from the gyro’s in your cell phone. The main three stats given are; Stroke Type (whether you pull the putter straight back and through, if you have an arc on your swing etc), Impact angle (whether the putter head straight at impact) and Tempo (follow through after impact, i.e. perfect would be 2:1. Meaning you swing though double the distance, of what the back-swing was). After each swing the stats will appear on the cell phone screen for you to see. There are also a number of advanced stats which you can also monitor.

There are some additional features also. You can view and compare your putting stats to Ping PGA Pro’s. You can also do a “fit” where the app will recommend Ping putters which suit your swing. In addition you can save sessions and compare to previous.

I found the app a great tool – especially so as it is totally free! I practiced inside my house using my SKLZ  putting mat (review is posted here). I always thought that I was pulling the putter back and through in a straight line. However I discovered I had a 10 degree arc (strong arc). The following day I went to my local golf store and tried a putter which was marked as ideal for a player having a strong arc. It was the Ping ZB S TR. I could not believe it. The putter felt great and 5 of my 10 10ft putts went in the hole. With the other putters I found the balls were going right. This made sense as the strong arc putters are weighted in a way that helps the face of the club to swing around towards center at impact.

I found iPing worked better on the iPhone than the Note 2. Simply because the iPhone is smaller and lighter weight. The Note was a little unwieldy when trying to fasten onto the putter. I did find a glitch when using the Note. I found I could practice fine and the putts were instantly read; but if I tried the Measure or Fit function it would not read any of the 5 putts. I think this could be as I had the cell phone attached to the club with rubber bands and not secure in a cradle.

Overall this is a really fun and useful gadget. The main use for me would be to check that the face of the putter is straight at impact. As it is free tool I highly recommend downloading it if you have an iPhone or Samsung Galaxy. I would say that iPing is probably the best app I have downloaded on my phone in the past couple of years.

I am interested to hear your feedback. If you have any questions or thoughts on the product please post them in the comment box below.

Izzo Mini Mouth 24-Inch Chipping Target Review

With chipping being such a big part of the short game, I decided to buy a chipping net so that I could practice. This is one area of the game where I need to practice and improve. I estimate that I can knock about 3-5 shots off on a par 27 round, with better chips and pitches.

I decided to purchase a chipping net to practice with. The advantage of using a chipping net is that is a fixed target for you to aim at. Also if you are hitting with control the net will catch the balls, saving you the hassle of walking the hitting area to collect up all of the balls at the end.

After searching online for a chipping net I found the Izzo Mini Mouth 24-Inch Chipping Target. The net is 24″ in diameter and folds so that it can be put into a standard golf bag. The product had good reviews online and cost under $20 shipped which attracted me to the product.

I have a small park directly across from where I live and there is a nice quiet area where I can practice. I take the Mini Mouth net and a bag of balls with me. I typically go a couple of times a week after work and hit for about 30 minutes in a session. From doing this I have already noticed a significant increase in my game. The short game is all about touch and from practicing, I have improved my touch around the green.

When I first went to practice I made the mistake of setting up the net with some bushes behind. After loosing 5 golf balls in the first couple of minutes I figured out that I should turn it around and ensure there is clear space behind the net. So if I missed, the balls would not be lost in the foliage.

The net itself works really good. I was worried it may be too small, but it is not an issue. Only minor negative is that it is a little tricky to fold down. There is not really too much I can write about this net as it is a simple product and self-explanatory. But overall it is a handy piece of equipment to have and I recommend this product, especially at the low price point.

Positioning the net with bushes behind = lost balls!

How to Re-Grip Your Own Clubs

It is recommended that you put new grips on your golf clubs at least every two years, if not annually. Also if you ever buy used clubs, you should install new grips. Most golf stores can do this for about $5 plus the cost of the grip. But if you are doing a full set of clubs it can get expensive.

I recently put new grips on my clubs. If I can do it with my DIY skills, then anyone can! It was relatively simple and took only a few minutes for each club. Here is how you go about it;

What you need

  • Workbench vice
  • Rubber vice clamp
  • Sharp knife
  • Paper towels or old rag for cleaning
  • Adhesive grip tape (double sided)
  • Mineral Spirits
  • New grips – enough for all your clubs. If you are doing this for the first time you may need a couple of spares in case you mess up.

Step by Step Instructions

1. Remove the old grip with a sharp knife. Be careful not to score too deeply and damage the club shaft. Under the grip will be the old adhesive tape; remove this also. If it doesn’t simply peel off you can use a special tool for this. I just use a standard stanley knife and scrape it off.

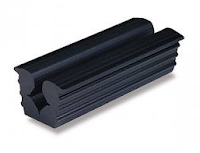
2. Place the club in a workbench vice. Use a rubber vice clamp so the shaft does not get damaged. You can get them for about $2 from most golf stores. It is really important that you use a vice to secure your club. Otherwise you will not be able to apply the pressure to put the grip on. I picked up a small portable table-top swivel vice from Harbor Freight for less than $25.

Rubber vice clamp

3. Apply the adhesive grip tape onto the shaft of the club. The tape can be found at most online/ retail golf stores. Measure the grip to ensure that the tape will not show once the grip is on. Allow about 1/2″ of the tape to stick over the end of the shaft. I then twist it together and stick into down into the top of the shaft. This ensures that no liquid can get in the inside of the shaft and cause any rust.

4. Spray mineral spirits in the inside of the grip. 3-5 sprays should be good. There is no need to by shy, the more you use the easier it is to apply the grip. Put your finger over the end of the grip and swirl it around. Then pour the mineral spirits out and onto the adhesive tape which is attached to the shaft.

5. With one hand hold the shaft of the club and with the other hand slide the grip on. Do it quickly and in one smooth motion – do not stop until the grip is fully on. If you have used enough mineral spirits the grip should slide on easily. If you do not use enough mineral spirits the grip will not slide on and most probably get stuck or rip.

6. Wipe off any excessive mineral spirits from the club using an old rag or a paper towel.

7. Remove the club from the vice and allow to dry for an hour or two before use. The mineral spirits will evaporate and allow the adhesive tape to stick to the grip.

Here is a short video I found on YouTube to demonstrate the process…

Golf Grip Fitting

I use Winn Excel RF soft midsize grips in copper color (part # 6715W-CP). I love the feel of them – the grips feel really nice and soft in the hand. Also the color makes a change from generic black. I recommend that you go to your local golf store and try different grips to see what suits you. Also they will have samples where you can get fitted for size.

Typically golf grips come in three sizes; regular, mid-size and over-size. Here is the quick fit method for grip sizing (courtesy of http://www.rhodygolf.com):

  • Take your grip with the left hand only.
  • Take notice of where the ring and middle finger end up.
  • If these fingers end up wrapped into the palm (like making a fist) then the current grips are too small.
  • If the fingers on the other hand almost form the letter “c” then the grips are more than likely too large.
  • A properly sized grip will fit in the players’ hand with comfort and the ring and middle finger will almost touch the palm 

All of the parts required to do this can be purchased reasonably online through a website such as Hireko Golf.

Here is a link…
Hireko #1 Source For Golf Clubs and Golf Component

The Twister Portable Golf Ball Cleaner Review

I came across The Twister portable golf ball cleaner while browsing gadgets on eBay. It was featured on ABC’s TV show Shark Tank. The Twister website claims that they were voted #1 golfers gift of the year. But there is no reference as to who/ when that was claimed.

The company that produces this product says that this “cleans your golf ball like a pro”. There are four features;
– Quickly and easily cleans dirty golf balls
– Easily clips onto golf bags for travel convenience
– Leak-proof case stores cleaning solution
– Made of durable drop resistant plastic

The product is well packaged in a green box. My initial impressions when opening the box was that this was big. The ball cleaner is 5 1/2″ x 3 1/2″ x 3 1/2″. In fact I think that this is may be too big and bulky to carry with all of the other golf paraphernalia which accompany me on my round. The product retails for $19.95, but I have seen it at various places online for about $10.

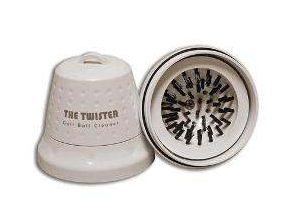
So how does it work? Basically you fill the product with water mixed with a cleaning fluid (dish soap) before you leave for your round. When you need to clean you ball, you unscrew it and put your ball in the center. You then twist the product like a pepper mill. The bristles inside it scrub the ball.

I have been testing/ using The Twister over the past couple of weeks. I was skeptical before I started using the product. It works fairly good. But doesn’t get the ball spotless, but certainly cleans the ball. It is a little tricky to screw up once the golf ball is inside it. You also have to remember to fill it with clean water and dish soap before you leave to play your round of golf. Also it as unclear how much water you put in. I looked on their website and there was nothing really noted. I just filled the base until the water came up to the bristles. But not too much water so that it spilled out when you open the Twister.

It has a clip to allow you to attach it to a golf bag. As shown in this picture to the left.

Would I recommend this product… I don’t know. I wouldn’t run out and buy one immediately. It works adequately, but it is so big and cumbersome. If you can pick one up for $10, I think it would make a good gift for a golfer who likes gadgets. But for me it is not a must have. If you play at locations which have ball wash stations on every tee, then I don’t see any point in hauling this around with you.

The Twister Cleaner, the one and only personal golf ball cleaning device with scrubbing bristles! The simplest and most effective tool to scrub dirt off your golf balls.
The Twister is leak-proof! Simply fill The Twister with a mild cleaning solution then insert a dirty golf ball into the watertight chamber.
Next, close the unit and shake it to wet the golf ball and bristles. Now twist and turn The Twister to let the bristles work on the golf ball, whisking away the dirt, grime, and grass for an all-around clean.
With this fantastic little golf ball cleaner, you can be sure you will get the maximum performance from your golf balls on every shot – especially on the greens.

Swing Whistle Review

The Swing Whistle is a small gadget which clips onto your golf club. According to the manufacturer this training aid is designed to “provide instant multi-sensory feedback to train your swing to have maximum speed at impact”. If you swing with a good tempo you hear a constant low whistle at impact.

  • Shrill = you are swinging too fast
  • No whistle = no lag and swing of the club
  • Early whistle = you are coming over the top and releasing the golf head too early
  • Constant low whistle at impact = ultimate result. This means that you have gradual acceleration through impact of the club with the ball.

The manufacturer claims that “installation is super simple, you just clip the Swing Whistle onto the shaft of the golf club”. The Swing Whistle goes at the bottom of the shaft on the hosel (just above the club head). To be honest I personally found it a little tricky to install. It is stiff plastic and it took a few minutes to force it onto the bottom of the shaft. It did not clip on with ease. Also every couple of swings I had to re-apply the device as it would slip off the hosel on the club

The Swing Whistle retails at  $19.95 plus shipping. I feel that this product is a little overpriced for what it is. It is just a small piece of plastic – I would be more comfortable with purchasing it at a price point of around $14.95 shipped.

Would I recommend it? Probably not. It is not that much of a game-changer for me. It makes the whistling noise as described. But I often found that with the speed of the swing it was sometimes hard to tell exactly when the whistle occurred. I would probably need to record the swing or have a spotter to give me feedback. What I do like about this training aid is that it can be used at home. You don’t necessarily have to hit a ball. Just swinging in the backyard will help you with your tempo. If you are hard of hearing or have issues hearing high pitch sounds, then this is obviously not for you!

X-Blade Tee Review

I recently got myself some of these X-Blade unbreakable tees. They are manufactured by a company called Stonehouse Design. I previously used the cheap generic tees from Target. Each hole I would have to use a new tee as the one I just hit from usually breaks. So the idea of an unbreakable tee appealed to me.

The tees come in two sizes; 2 3/4″ and 3 1/2″. A pack of 20 retails for $5.99.

Due to the shape of the tee it can also be used as a divot tool, which is handy. The tee’s I received came in a multicolored pack but I believe you can also get them in an individual color. When trying them on the course I did find the red ones hard to pick up against the grass color – but I am slightly colorblind, so that probably did not help the situation. I think in the future yellow or white would probably work best for me.

While initial testing the tee’s worked well. With each tee shot, the tee remained in the ground and did not fly 10ft from my hitting location like with a conventional tee. There are height markers molded on the side of the tee’s. Personally I did not have the need to use this feature. The top of the tee has four prongs which the ball rests on. I found that ball remained pretty stable while sitting on the tee.

I tried them out over several holes of play and did not break any tee – so I guess the product does what it claims! I really like these tee’s and right now will continue to use them. My only hesitation is that the tee is pretty big, so I am curious to see how they will work with the hard Southern California ground in the summer. I have a feeling that they could be hard to push into the ground. Do they increase drive length and accuracy?? Well my swing is not consistent enough to determine that. I think they will need to be tested in a controlled environment to see if that is the case.

They are millions of golf gadgets/ improvement devices etc. Many do not work or help. But I like these tees and will continue to utilize these tees and update my progress later in the year.

X-Blade tees can be found at many of the usual online retailers.