How to Re-Grip Your Own Clubs

It is recommended that you put new grips on your golf clubs at least every two years, if not annually. Also if you ever buy used clubs, you should install new grips. Most golf stores can do this for about $5 plus the cost of the grip. But if you are doing a full set of clubs it can get expensive.

I recently put new grips on my clubs. If I can do it with my DIY skills, then anyone can! It was relatively simple and took only a few minutes for each club. Here is how you go about it;

What you need

  • Workbench vice
  • Rubber vice clamp
  • Sharp knife
  • Paper towels or old rag for cleaning
  • Adhesive grip tape (double sided)
  • Mineral Spirits
  • New grips – enough for all your clubs. If you are doing this for the first time you may need a couple of spares in case you mess up.

Step by Step Instructions

1. Remove the old grip with a sharp knife. Be careful not to score too deeply and damage the club shaft. Under the grip will be the old adhesive tape; remove this also. If it doesn’t simply peel off you can use a special tool for this. I just use a standard stanley knife and scrape it off.

2. Place the club in a workbench vice. Use a rubber vice clamp so the shaft does not get damaged. You can get them for about $2 from most golf stores. It is really important that you use a vice to secure your club. Otherwise you will not be able to apply the pressure to put the grip on. I picked up a small portable table-top swivel vice from Harbor Freight for less than $25.
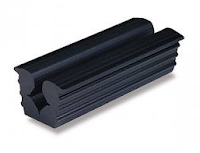
Rubber vice clamp

3. Apply the adhesive grip tape onto the shaft of the club. The tape can be found at most online/ retail golf stores. Measure the grip to ensure that the tape will not show once the grip is on. Allow about 1/2″ of the tape to stick over the end of the shaft. I then twist it together and stick into down into the top of the shaft. This ensures that no liquid can get in the inside of the shaft and cause any rust.

4. Spray mineral spirits in the inside of the grip. 3-5 sprays should be good. There is no need to by shy, the more you use the easier it is to apply the grip. Put your finger over the end of the grip and swirl it around. Then pour the mineral spirits out and onto the adhesive tape which is attached to the shaft.

5. With one hand hold the shaft of the club and with the other hand slide the grip on. Do it quickly and in one smooth motion – do not stop until the grip is fully on. If you have used enough mineral spirits the grip should slide on easily. If you do not use enough mineral spirits the grip will not slide on and most probably get stuck or rip.

6. Wipe off any excessive mineral spirits from the club using an old rag or a paper towel.

7. Remove the club from the vice and allow to dry for an hour or two before use. The mineral spirits will evaporate and allow the adhesive tape to stick to the grip.

Here is a short video I found on YouTube to demonstrate the process…

Golf Grip Fitting

I use Winn Excel RF soft midsize grips in copper color (part # 6715W-CP). I love the feel of them – the grips feel really nice and soft in the hand. Also the color makes a change from generic black. I recommend that you go to your local golf store and try different grips to see what suits you. Also they will have samples where you can get fitted for size.

Typically golf grips come in three sizes; regular, mid-size and over-size. Here is the quick fit method for grip sizing (courtesy of http://www.rhodygolf.com):

  • Take your grip with the left hand only.
  • Take notice of where the ring and middle finger end up.
  • If these fingers end up wrapped into the palm (like making a fist) then the current grips are too small.
  • If the fingers on the other hand almost form the letter “c” then the grips are more than likely too large.
  • A properly sized grip will fit in the players’ hand with comfort and the ring and middle finger will almost touch the palm 

All of the parts required to do this can be purchased reasonably online through a website such as Hireko Golf.

Here is a link…
Hireko #1 Source For Golf Clubs and Golf Component

Chipping vs Pitching

When around the green we have several options of which shot to play. We can putt (if the grass is short), play a pitch shot or play a chip shot. Here is the difference between a chip and pitch shot…

Chip shot (9 iron): The chip is best used when you are within 10-20 yards of the green or when on the apron of the green. Using a putting stroke the ball will fly low in the air and for a short period of time. The ball will land on the green and roll along it. This shot can only be played when you have a clear path to the green – i.e. there are no bunkers between the ball and green.

Pitch shot (56-60 wedge): Used when you are about 20-50 yards from the green or in a green-side bunker. The ball is hit with a lofted club and will go high in the air. This is a much harder shot to execute than the chip shot.

Recommended order for which shot to play around the green:
1. Putt whenever feasible (that means whenever the ball will roll rather than bounce).
2. Chip and run when you can’t putt.
3. Pitch only when you have no other choice.

Basic Putting Technique

The majority of golfers (including professionals) use a putter for 40% of all shots in a typical round.

Putting is something which really improves with practice. This is also the easiest aspect of the game to practice. Although it is always best to practice on a real golf green, there are a number of training aids which can be used to simulate the putting environment at home. One of which is the SKLZ Accelerator (which I review here: SKLZ Accelerator Putting Mat Review).

Here is a good short putting technique video which I found. It covers all of basics of putting in less than 3 minutes.

The Fundamentals of Putting (Basics)

  • Make sure your grip is perfect. 
  • Aim your club face at your target and sole the putter head directly behind the ball.
  • Position your eyes over the ball and down the target line. 
  • Set your shoulders, hips, knees and feet all parallel to the target line. 
  • Your hands should be directly under your shoulders and you should have a slight bend in your elbows. 
  • Ball position will be 2 inches inside your left heel.
  • Your forearms must be parallel to each other, maintaining the same place throughout the stroke.
  • Keep your head still while maintaining the angle in your right wrist throughout the stroke.

Basics of the Golf Setup

As with the grip, it is important to have the correct setup before hitting a golf ball. A whole website alone could be dedicated to this subject. But here are a few quick tips for the casual golfer. I strongly advise anyone who hasn’t already, see a professional for a lesson. Even if it is just one 30 minute lesson to look at your grip and setup, it will make a huge improvement to your game and help eliminate some of those bad habits early on.

This video shows you how to correctly set up in 5 easy steps…

Alignment: At address your body (feet, knees, hips, forearms, shoulders and eyes) should be positioned parallel to the target line.

Foot position: Your feet should be shoulder width for the middle irons. The short iron stance will be two inches narrower and the stance for long irons and woods should be two inches wider.

Balance: Your weight should be balanced on the balls of the feet, not on the heels or toes.

Posture: Your knees should be slightly flexed. Your body should bend at the hips (not in the waist) with a straight back.

Swing Whistle Review

The Swing Whistle is a small gadget which clips onto your golf club. According to the manufacturer this training aid is designed to “provide instant multi-sensory feedback to train your swing to have maximum speed at impact”. If you swing with a good tempo you hear a constant low whistle at impact.

  • Shrill = you are swinging too fast
  • No whistle = no lag and swing of the club
  • Early whistle = you are coming over the top and releasing the golf head too early
  • Constant low whistle at impact = ultimate result. This means that you have gradual acceleration through impact of the club with the ball.

The manufacturer claims that “installation is super simple, you just clip the Swing Whistle onto the shaft of the golf club”. The Swing Whistle goes at the bottom of the shaft on the hosel (just above the club head). To be honest I personally found it a little tricky to install. It is stiff plastic and it took a few minutes to force it onto the bottom of the shaft. It did not clip on with ease. Also every couple of swings I had to re-apply the device as it would slip off the hosel on the club

The Swing Whistle retails at  $19.95 plus shipping. I feel that this product is a little overpriced for what it is. It is just a small piece of plastic – I would be more comfortable with purchasing it at a price point of around $14.95 shipped.

Would I recommend it? Probably not. It is not that much of a game-changer for me. It makes the whistling noise as described. But I often found that with the speed of the swing it was sometimes hard to tell exactly when the whistle occurred. I would probably need to record the swing or have a spotter to give me feedback. What I do like about this training aid is that it can be used at home. You don’t necessarily have to hit a ball. Just swinging in the backyard will help you with your tempo. If you are hard of hearing or have issues hearing high pitch sounds, then this is obviously not for you!

The Proper Golf Grip

The grip is an important part of your swing mechanics. Without the proper balance in your hands your golf club can do a number of bad movements in your golf swing from beginning to the follow through. According to the PGA, 70% of golfers need to correct their grips.

Here is a video from the Golf Fix. This is an instructional show broadcasted on the Golf Channel on Monday’s at 7pm. The Golf Fix is hosted by PGA 2012 Teacher of the Year, Michael Breed.

www.free-online-golf-tips.com

SKLZ Accelerator Pro Putting Mat Review

So today I am reviewing the SKLZ Accelerator Pro ball return putting mat/ green. I have had this product about a year now and feel that I can give some good feedback on this item. At the time I was looking to improve my putting and wanted to find a mat which I could use at home. I looked at several different options and found that many were simply too short or were gimmicky – i.e. had areas for water etc. This detracted from the my main purpose – to find an indoor putting green which would help me improve my putting stroke. As this is blog is focused on golf in the Los Angeles area, I should also note that SKLZ who make this product are a local based company and based in Southern California.

This putting mat is 9ft long and has an uphill gradient (19 degree slope). This is designed to make sure you hit the ball firm and train the golfer to hit 18″ past the hole; thus ensuring you do not leave your putt’s short. With the gradient aspect, it allows the ball to roll back to you by gravity along a simple strip of plastic. I found that this works adequately. Sometimes a ball will get stuck in the hole, but once you hit a second or third it frees them all up and the roll back.

One claim though I must disagree with. It says on the box, “lays flat immediately upon removal of the box”. I found that this is not the case and if it has been stored away in the box, I have to leave it overnight with books on to make it flat once again.

The key feature for me of this mat are the marked alignment guides. These are at 3 foot, 5 foot and 7 foot. These guides train you to bring the putter not only back the right distance for the specific putt, but also straight. It is obviously important that the face of your putter is straight to the target when hitting through the ball. A lot of people practice the long game out on the range, but do not practice putting so much (if at all). These 3, 5 and 7 foot putts are important to your game – 60-65% of shots on a typical round are within 100 yards of the hole. Improving your putting stroke will have a direct impact on helping to lower your score.

I think the quality of the product is good for the price. It is made of plastic and note; this costs less than $50, so don’t expect high-quality construction. Despite that it has held up well thus far. My only grip is that it attracts a lot of pet hair, but I guess that is true with anything you put on the floor. I just simply vacuum it. The product folds down and goes away into the box relatively easily. I recently moved to somewhere with hardwood floors and it works great. Previously I used it on carpet and it also worked well. The mat has a Stimpmeter rating of 10 on a firm rug and 11 on linoleum surface. According to the manufacturer it is made from a true-roll-turf and the edges will not unravel. From what I have seen, I would say that this is accurate.

My set-up at home

It is important when putting to have a good routine and a consistent stroke. I ensure I go through my same on-course routine when I use this training aid, in order to get it ingrained into my brain. I happen to have my mat positioned in a corridor with a mirrored closet door in front of me. This is good as I can check on my posture and position of the ball as I take each putt.

I really feel that this product has helped with my putting stroke and in particular alignment. If you just spend a few minutes each day, you will notice the difference out on the course. In addition I consider the SKLZ Accelerator Pro Ball Return Putting Mat reasonably priced (~$40) compared to some of the other products out there.